


CODING A CONTAINER LAYOUT...
Step One) Open up your CPanel or Dreamweaver. Whichever you prefer to code in. I prefer coding in dreamweaver but for this tutorial I will just be using CPanel. Please note, this tutorial may or may not be all over the place. Just pretend like we are talking.
Step Two) You are going to need to create these files: style.css, header.php, index.php, footer.php
Step Three) Open your index.php file and you’re going to put in your PHP includes. This isn’t a php includes tutorial but this is the code:
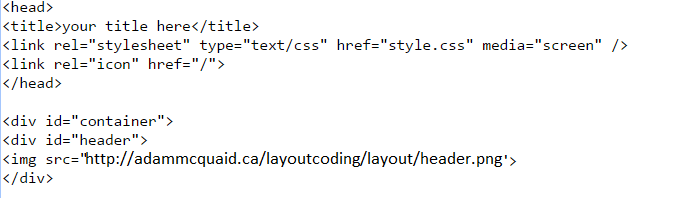
Step Four) Open your header.php and your style.css file. When coding, I like to have both files open. It makes things a lot easier. On your header.php page you are going to first want to add in your < head > things. That is your title, stylesheet, etc. Below is the one I add into all my CSS templates and premades. You can go ahead and add all the extra things you want. You would also add your font faces urls here and such.
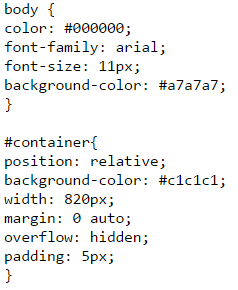
Step Five) Switch over to your style.css file. You’re going to add your body and container div. The container is really important since this is a container layout. Basically, that means everything is inside of this box. Be sure to add < div id ="container" > on your header.php file. You will play with these codes on your own to make it your own stylesheet. You can look at my coding reference if needed. Tip: You will have to do some basic addition and subtraction when coding. If you have one sidebar that is 200px and your content area is 600px. The container needs to AT LEAST be 800px. If you add margins and stuff, it will obviously need to be bigger. You’ll have to play with that on your own.
This is the coding I have on the stylesheet for the body and container. I am doing this really simple. But you can go ahead and add in all of your things and decorate it how you want.
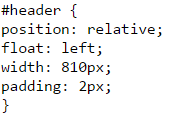
Step Six) Header part! You are going to want to create another div box for your header. Below are the codes for both style.css and header.php. You are going to want your pages to look similar to that. Your header will be as wide as your container if you want it the full size. Like I said earlier, you’ll need to do the math. If you want an updates box next to it or anything like that it will obviously be different sizes. I added float left on my header. You can do float right. When working with container layouts, you will use the floats.
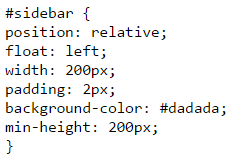
Step Seven) Sidebar time! You’re going to want to create another div box for your sidebar. Remember, you can call these whatever you want. I usually keep header, sidebar, container, and footer all like that. But when I am adding boxes I do random first names or something. It just helps me stay organized. You can do that however you’d like. Just remember to use the names you use and not the ones I use if you are using different ones. Now, when you are doing your sidebar, usually 200px sidebars look good. You can do whatever size you want. This is just a tutorial on how to do the coding with your own decoration part so that you’re actually creating your own container layout. You will also need to add your float. If you want your sidebar on the left it’ll be float: left and if you want it on the right it is going to be float: right. I am doing mine very simple but you can add borders and anything else you want.
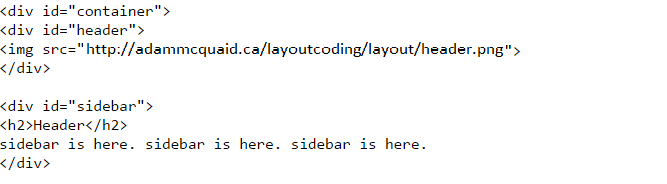
Step Eight) Now on to the content part. We are going to do the same thing we did for the sidebar. You’ll probably need to play around with the padding and margins until you get it how you like. When you are doing the float, this will need to be the opposite of what you did for the sidebar. So since my sidebar is on the left my content will need to be on the right.
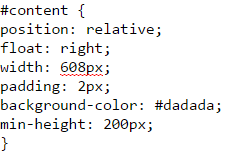
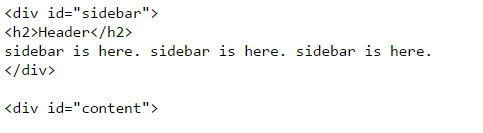
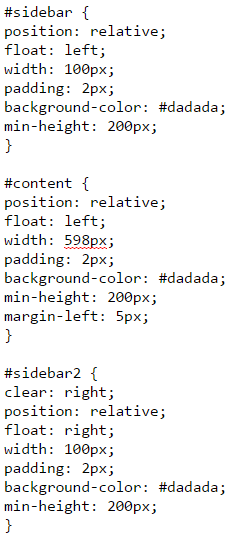
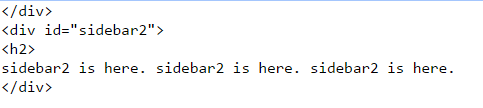
Extra: If you want two sidebars, you will need to have two floats being the same. So if you have your float left sidebar. You’ll do your content section float left as well. Then, the second sidebar will be float right. You will also need to put the sidebar two div id after your content section. So, in this case, it would be in the footer.php file. If you put it before you will have a messed up layout because the internet will not understand. Below is what the style.css coding will look like and the footer.php code. Remove the clear right on sidebar2. I forgot to do that before taking a screen shot, lol. You don’t need it.
That first < / div> in the coding below is the closing div for the content area. You see that the second sidebar will need to be after that.
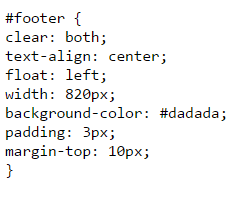
Step Nine) Footer! Okay, you can go ahead and close your header.php because we are all done with that. Just go ahead and open footer.php and still have your style.css open. When you are doing the footer part, you are going to make sure you add clear: both. This will make sure that your footer section is going to go underneath the left and right sidebar and content areas. Note: I took off the second sidebar so that is why that code is no longer on my footer. But if you do have the second sidebar, your footer will go after that.

Step Ten) Yay! All of the positioning is now done. Unless you want to add some extra boxes and such. If you do, you will do that the same as we did all the things above. We still have quite a lot left but it is all the header, text, and link decorating. But since this is kind of how you want to do it, you will kind of need to take this step on your own and decorate your links and such how you want. So, I am just going to provide you an outline of everything you need and you will need to fill that in. But I will take you through everything! No worries. I just figured this is going to be much easier. CLICK HERE to get the file. You can keep this file for yourself. This is just basic coding things. No need to give credit for this unless you want to.
Step Eleven) You’re going to want to paste everything in that file onto your style.css. Now, I am going to explain this quickly. I broke everything up. The top section is your bold, italic, underline, strike, big, and small text. You can make these look however you want. I usually just add in a color: #hexcode and be done with those. The middle section is all of your headers. < h1 > Header < / h1> is the code that you would use on your header.php page. Remember to remove the spaces if you copy that. You can make as many headers as you’d like. The last section is your links. The first one that you see in the file is your regular a href link. I usually just change the colors and leave that how it is. The link after that is a link you would use in your sidebar. You can change the name of those and make as many as you want. You can decorate those however you want as well. I am not going to get in depth on how to decorate everything because that all depends on what you like and how you want your layout. We have covered the whole process of creating a container layout though! Yay!
Step Twelve) You can check out my coding reference chart on codes that you will use for your decorating. These all have explanations on them as well. You can also use google for cool tricks that you want to add into your decorations. You have so many options of things you can do when it comes to coding layouts. CLICK HERE to see the layout that was created for this tutorial. This is just really simple. Feel free to view the page source and you can go ahead and grab the codes for yourself if you need and then just change them up how you need. This is just a basic stylesheet. Nothing real fancy. I hope you all enjoyed this tutorial and it was really fun to make! I hope this helps all of you! <3


